Generation Sets
A generation set can be seen as a version of a AMT-COBOL developed application. It is possible to create multiple generation sets, but at least one generation set has to be created in order to generate an AMT-COBOL application. Generation sets called, for example, "Development", "Testing", and "Production" could be defined to have three generation sets—one for each of those stages in development. Object revisions are promoted from one generation set to another. Objects are also edited and generated independently in each generation set.
An imported application will have one generation set called Default from source. It is advised to delete this generation set and create at least one new generation set in its place.
Adding or Changing Generation Sets
All generation sets that are available for an application are shown in the list box at the top of the Generation Sets view. Below this list box, all the options of the selected generation set are displayed. The order in which the generation sets are displayed can be changed by selecting a generation set and using the ▲ Move up and ▼ Move down arrow buttons next to the list box.
Follow the instructions below to add a generation set or change its settings:
- Navigate in the AMT Developer Studio to View → Generation Sets.
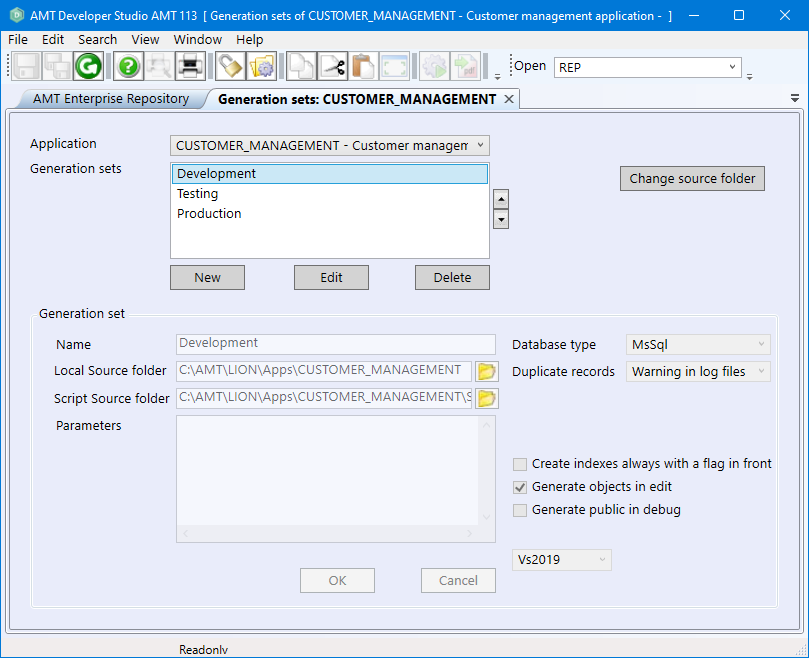
The Generation Sets view.
- Select the New button to add a new generation set or select the Edit button to change an existing one.
- Use the options listed below as a guide to configure the generation set:
- Name: A free-to-choose name for the generation set, such as "Development".
- Local Source folder: The path to the directory where generated objects are placed. The generator requires a local path to generate into.
- Script Source folder: The path to the directory for executable script files managed by the AMT Developer Studio. These script files are also stored in the Repository database. It is recommended to use a UNC path as script source folder to avoid issues accessing the scripts.
- Parameters: Several generation switches can be set in this field. Visit the Generation Switches page for a list of all available switches.
- Database type: The type of database that is used by the application.
- Duplicate Records: Specify the behaviour of the system if duplicate records are inserted. Visit the Duplicate Records Behaviour page for a list of all available options.
- Create indexes always with a flag
in front:
- If enabled, indexes are always created with a flag in front.
- If disabled, index flags are not created without index logic. This increases the performance of
the generated system.
Changing this option leads to longer reorganizations of the database. It is recommended to disable this option when generating a new system.
- Generate objects in
edit:
- If enabled, while tables, indexes, or application options are being edited (locked), these objects are able to be generated while in the locked state. Therefore, these objects do not need to be checked-in in order to be generated.
- If disabled, objects must first be checked-in before they can be generated.
- Generate public in debug: This option influences the behaviour of the "Generate in debug" feature of the AMT Developer Studio. See the Generate public in debug behaviour page to learn more about the behaviour of this option.
- Select the OK button to save the configured options for the generation set.
If a NEW generation set was made, it is also necessary to perform a Get all newest in Revision Control using the new generation set to retrieve all objects in the new generation set. - Perform a Whole system generation—every time the options of a generation set are changed, it is necessary to perform a Whole system generation.
- Perform a Reorganization of the database.
Switching Generation Sets
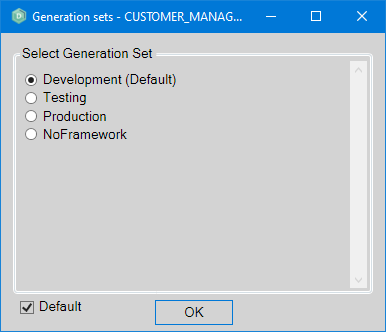
To switch from one generation set to another, select the  Choose Generation Set
button from the toolbar. If the selected generation set should be used the next time the AMT Developer Studio is
started, check the Default checkbox on the displayed dialog window. If no Default is set, this
dialog window (also shown in the image below) will be presented every time a directory is
selected in the Repository view.
Choose Generation Set
button from the toolbar. If the selected generation set should be used the next time the AMT Developer Studio is
started, check the Default checkbox on the displayed dialog window. If no Default is set, this
dialog window (also shown in the image below) will be presented every time a directory is
selected in the Repository view.