
OpenID Connect Authentication
The correct authentication methods have to be configured after the web applications have been added in the IIS Manager. This page will explain how to configure the web applications to make use of OpenID Connect authentication.
Each AMT web application consists of a front end and a business logic end. In OAuth terms the front ends are relying parties, the business logic ends are resource servers. Each of these web applications should be added to an OpenID Connect identity provider.
On this page the Control Center and Application Center will be configured with a client secret. To use a signed client assertion instead, the advanced configuration pages for the Control Center and Application Center can be used.
Log in on the server running the AMT website and follow the instructions on this page to configure the settings of the OpenID connect identity provider of your choice to access the Control Center.
| When upgrading from an older authentication type to OpenID Connect authentication, it is strongly recommended to start with a fresh copy of the sample appsettings file. |
Configuring Appsettings
Front ends of the ControlCenter and ApplicationCenter
- Navigate to the following directories:
..\<AMT_Environment>\AmtTools\ControlCenterCore
..\<AMT_Environment>\AmtTools\ApplicationCenterCore - Open both appsettings.json files found in these directories in a text editor and configure the
settings listed below.
- In the AmtOIDC section:
- ClientId - The client ID of the application as configured in the OIDC Identity Provider. Separate ID for each AMT web application.
- Authority - The URL of the OIDC Identity Provider endpoint.
- Scope - The scopes to request from the authorization server to allow access tokens to be used to call other resource servers (e.g. CC BL, AC BL or Blazor APIs). We advise to use separate scopes for each AMT web application.
- ClientSecret - The client secret of the application as generated in the OIDC Identity Provider, not applicable if client assertion is enabled. Separate secrets for each AMT web application.
- NameClaimType - The claim type that will be used to identify the user. Commonly
preferred_usernameis used as claim type. The claim type must be identical to the claim type set in the WebAPI appsettings.... "AmtOIDC": { "OIDC": { "ClientId": "amt-controlcenter" | "amt-applicationcenter", "Authority": "https://login.example.org/amt-applications/v2/auth", "Scope": "openid profile amt-cc-webapi-scope" | "openid profile amt-ac-webapi-scope", "ClientSecret": "c8A6L7j5E3N0n9Y", "TokenValidationParameters": { "NameClaimType": "preferred_username" } },
- In the AmtOIDC section:
- Save both files.
Businesslogic of the ControlCenter and ApplicationCenter
The AC & CC WebAPI are resource servers that validate tokens received by the AC and CC front ends to create a session.- Navigate to the following directories:
..\<AMT_Environment>\AmtTools\ControlCenterWebApi
..\<AMT_Environment>\AmtTools\ApplicationCenterWebApi - Open both appsettings.json files found in these directories in a text editor and configure the
settings listed below.
- In the Authentication section:
- AuthenticationType - Set to "JWT" (JSON Web Token)
- Authority - Enter the URL of the authorization server.
- Audience - Set the configured intended recipient of the access token.
- NameClaimType - The claim type that will be used to identify the user. Commonly
preferred_usernameis used as claim type. The claim type must be identical to the claim type set in the ApplicationCenterCore and ControlCenterCore appsettings."Amt": { ... "Authentication": { "AuthenticationType": "JWT", "JWT": { "Authority": "https://login.example.org/amt-applications/v2/auth", "Audience": "amt-ac-webapi" | "amt-cc-webapi", "TokenValidationParameters": { "NameClaimType": "preferred_username" } }
- In the Authentication section:
- Save both files.
Configuring IIS
- Open the IIS Manager and navigate to the web applications that were previously added during the process of Adding the Necessary
Websites to the IIS.
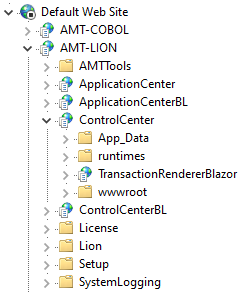
The following set of web applications to configure are:
- ControlCenter
- ControlCenterBL
- ApplicationCenter
- ApplicationCenterBL
- Select a web application and open the Authentication menu found in the middle pane of the IIS
Manager.
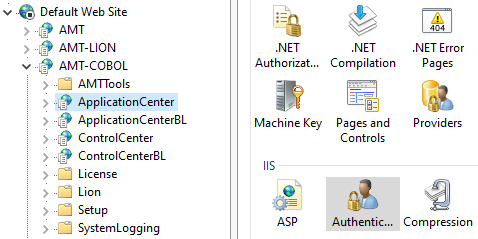
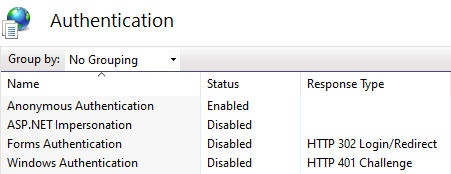
- Enable the Anonymous Authentication option by selecting the setting and then selecting
the Enable button found in the right pane of the IIS Manager. The remaining
authentication
options should be set to Disabled. Do this for all web application listed
above.
- Locate the TransactionRendererBlazor (found when expanding ControlCenter) and open the
Authentication menu as described previously.
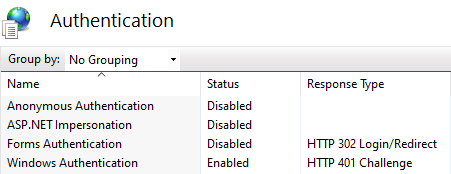
- Set the Windows Authentication option to Enabled, even when using the cookie authentication method for web applications. The remaining authentication options should be set to Disabled.
- Restart the IIS after all authentication methods have been configured to ensure that all changes take
effect.