Security
AMT can use your Windows user name to set your security. This user has to be defined in AMT and assigned to a user group, which determines the user's access rights. To define users and user groups within AMT Development, select the menu item "View - Security", or enter "SEC" in the Open commandbox. The authorization screen will appear (only available to the system administrator). Please note that these options apply only to AMT Development users. AMT runtime users have their security settings specified via the Control Center.
| The user of the current user can be viewed in the 'About...' window (accessed from the 'Help' menu) inside the AMT Developer Studio. |
Inheriting Users
The SEC options will inherit users from the following sources:
- Imported Applications: Imported applications contain revision control and therefore user codes. These users will be imported into the SEC. They will, however, have no rights.
- Repository: Users will also be inherited from the repository.
The authorization screen contains the tabsheets as shown below:
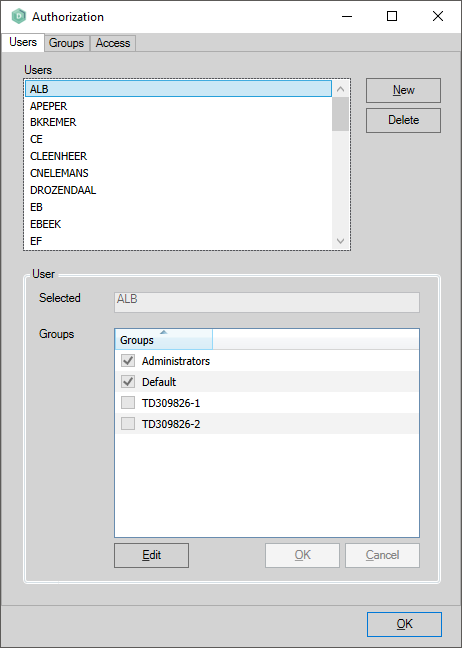
- "Users" - add or remove user and specify the user group to which a user belongs.
- "Groups" - add or remove user groups and specify users within the user groups.
- "Access" - specify the access roles that a user group has for selected applications. If a user is in a group that has been given access roles, these roles still apply if this user is also assigned to one or more other groups that have not been given those roles.
Adding a new User
- This is done on the "Users" tabsheet.
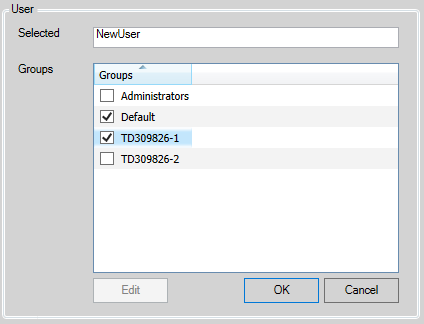
- Click the "New" button, The User group box will become active.
- Enter the name of the user to add and in the groups list select the user group(s) the user should be a member of as shown below. Then click "Ok".
- Once a user has been added, it is not possible to change the user name.
Adjusting/Deleting a Usercode
- This is done on the "Users" tabsheet.
- To adjust the settings of a user, select the user and click "Edit" (or double-click on the user name). In the User group box, (de)select the user group(s) then click "OK".
- To delete a user, select the user then click "Delete". Click "Yes" to confirm.
- A deletion will only remove the user, and not its user group.
Adding a new user group
- This is done on the "Groups" tabsheet.
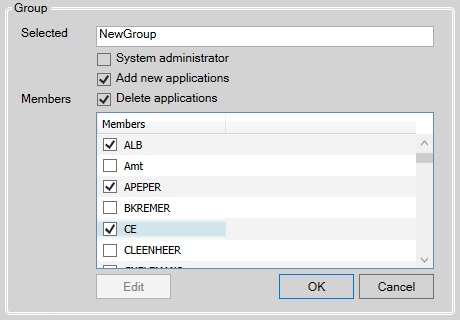
- Click the "New" button, the Group group box will become active.
- Enter the name of the group to add and in the members list select the user(s) that should be member of this group as shown below. Then click "Ok".
- When the "System administrator" checkbox is checked, members of this user group will be system wide administrators. This setting overrides all other security settings giving the members full control of the repository.
- When the "Add new applications" checkbox is checked, members of this user group will be able to add new applications to the repository.
- When the "Delete applications" checkbox is checked, members of this user group will be able to delete applications from the repository.
- Once a user group has been added, it is not possible to change the user group name.
- New user groups will have the 'Look into' permission enabled by default for all applications.
Adjusting/Deleting a User group
- This is done on the "Groups" tabsheet.
- To adjust the settings of a user group select a user group and click "Edit" (or double-click on the user group). In the members list, (de)select the user(s) then click "OK".
- To delete a user group, select it then click "Delete". Click "Yes" to confirm.
- A deletion will only remove the user group, and not its users.
Setting the Access Permissions
- This is done on the "Access" tabsheet.
- Select a user group and an application generation set, then click the "Edit" button. The Access permissions group box will become active as shown below.
- Select the required rights in the "Access permissions" list. These are described below.
- Click "OK" to accept the changes.
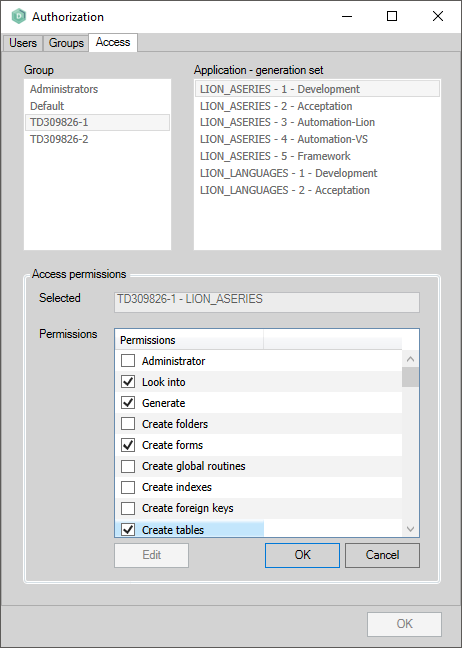
| Changes to permissions of other users will become active once the user has restarted the AMT Developer Studio. |
The access permissions are as follows :
|
Access permission: |
Description: |
|---|---|
|
Administrator |
To have all the rights that are described below. |
|
Look into |
To have all read abilities. For new user groups, this permission is enabled by default for all applications. |
|
Generate |
To generate the application. |
|
Create Folders |
To create folders. |
|
Create Forms |
To create forms. |
|
Create Global Routines |
To create global routines. |
|
Create Indexes |
To create indexes. |
|
Create Foreign Keys |
To create foreign keys. |
| Create Triggers |
To create triggers. |
|
Create Tables |
To create tables. |
|
Create Stored Procedures |
To create stored procedures. |
|
Create Views |
To create views. |
|
Create Reports |
To create reports. |
|
Create File Definitions |
To create global file definitions. |
|
Create Web Services (Consumed) |
To create consumable webservices. |
|
Create Web Services (Provided) |
To create provided webservices. |
|
Create Image lists |
To create image lists. |
|
Create Global Definitions |
To create global definitions. |
|
Create Global Dictionary |
To create global dictionaries. |
|
Create Classes |
To create classes. |
| Create External Interface |
To create external interfaces. |
| Create Script Folders |
To create script folders. |
| Create Scripts |
To create scripts. |
|
Modify Application |
To modify all application options. |
|
Modify Folders |
To modify folders. |
|
Modify Forms |
To modify forms. |
|
Modify Global Routines |
To modify global routines. |
|
Modify Indexes |
To modify indexes. |
|
Modify Foreign Keys |
To modify foreign keys. |
| Modify Triggers |
To modify triggers. |
|
Modify Tables |
To modify tables. |
|
Modify Stored Procedures |
To modify stored procedures. |
|
Modify Views |
To modify views. |
|
Modify Reports |
To modify reports. |
|
Modify File Definitions |
To modify global file definitions. |
|
Modify Web Services (Consumed) |
To modify consumable webservices. |
|
Modify Web Services (Provided) |
To modify provided webservices. |
|
Modify Image lists |
To modify image lists. |
|
Modify Global Definitions |
To modify global definitions. |
|
Modify Global Dictionary |
To modify global dictionaries. |
|
Modify Classes |
To modify classes. |
| Modify External Interface |
To modify external interfaces. |
| Modify Script Folders |
To modify script folders. |
| Modify Scripts |
To modify scripts. |
|
Delete Folders |
To delete folders. |
|
Delete Forms |
To delete forms. |
|
Delete Global Routines |
To delete global routines. |
|
Delete Indexes |
To delete indexes. |
|
Delete Foreign Keys |
To delete foreign keys. |
| Delete Triggers |
To delete triggers. |
|
Delete Tables |
To delete tables. |
|
Delete Stored Procedures |
To delete stored procedures. |
|
Delete Views |
To delete views. |
|
Delete Reports |
To delete reports. |
|
Delete File Definitions |
To delete global file definitions. |
|
Delete Web Services (Consumed) |
To delete consumable webservices. |
|
Delete Web Services (Provided) |
To delete provided webservices. |
|
Delete Image lists |
To delete image lists. |
|
Delete Global Definitions |
To delete global definitions. |
|
Delete Global Dictionary |
To delete global dictionaries. |
|
Delete Classes |
To delete classes. |
| Delete External Interface |
To delete external interfaces. |
| Delete Script Folders |
To delete script folders. |
| Delete Scripts |
To delete scripts. |
| Delete Gen. Requests Others |
To delete generation requests from other users. |
|
View changes of locked objects |
To view a currently locked object that is being edited by another user. This gives you a view of the changes up until the last Save action was performed. |
|
Grant locks to other users |
To reassign a locked object to another user. |
|
Select generation priority |
To set a different priority level for the objects that will be generated. |
|
Change generation priority |
To change the generation priority for objects that are already queued for generation. |
|
Select Revision IDs |
To select another object version through the Revision History screen or through the "Move into Genset" option in the Label Management screen. |
|
Enable Get All Newest |
To enable the option "Get All Newest" in the Revision Control screen. |
|
Export LionSources |
To export source code from the repository. |
|
Import LionSources |
To import source code into the repository. |