
Macros
In AMT Screens, users can automate sequential keypress events on a form by using macros. This functionality is available from the Macros menu. The Macros menu includes the options Record macro, Stop macro, Edit macro, and Macro security, plus user-accessible macros as shown below.
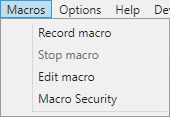
Record macro
Use this option to record a new macro. After you select this option, every keystroke is recorded in the new macro until you select Stop macro.
Stop macro
Select this option to stop recording keystrokes and open the Macro Editor window, where you can define the macro name, menu name, and keyboard shortcut. For more information about the Macro Editor window, see its own section below.
Edit macro
Opens the AMT Macro Editor, where you can modify your macros.
| This option is visible only to users assigned to a role with the security component "Macro Editor" enabled. |
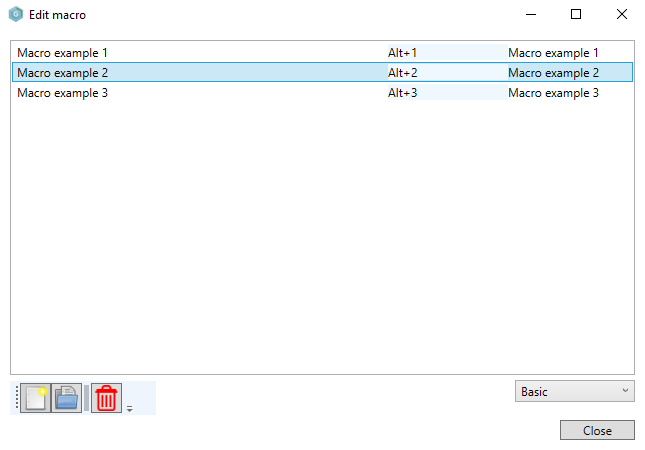
To create a new macro, select the New button (shortcut Alt+N). To edit a macro, select the macro entry and select Open, double-click the entry, or press Enter. Both options open the Macro Editor window. With New, the fields are empty (see Macro Editor below).
To remove a macro, select the macro entry and select Delete, or press Delete. Deleting a macro removes access to that macro for that user. If the user is the only user assigned to the macro, the macro is deleted from the database. Macros assigned to a role cannot be removed. If a user also has the "Advanced Macro Editor" security component enabled in a role they are assigned to, a drop-down menu is visible above the Close button. When Basic is selected, only the macros that the user can access are displayed. When Advanced is selected, macros assigned to other users or roles are also displayed.
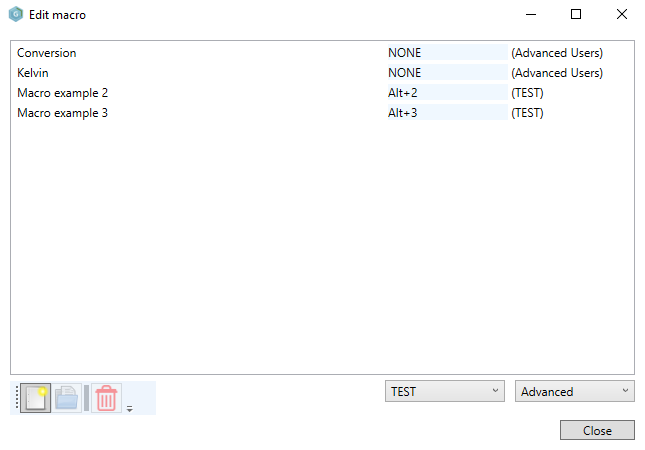
An additional drop-down menu lets you limit displayed macros to those assigned to the selected user. This includes macros assigned directly to the user and macros assigned through a role that the user is a member of. The screenshot above shows all macros for user "TEST", who is a member of the "Advanced Users" role.
Macro editor
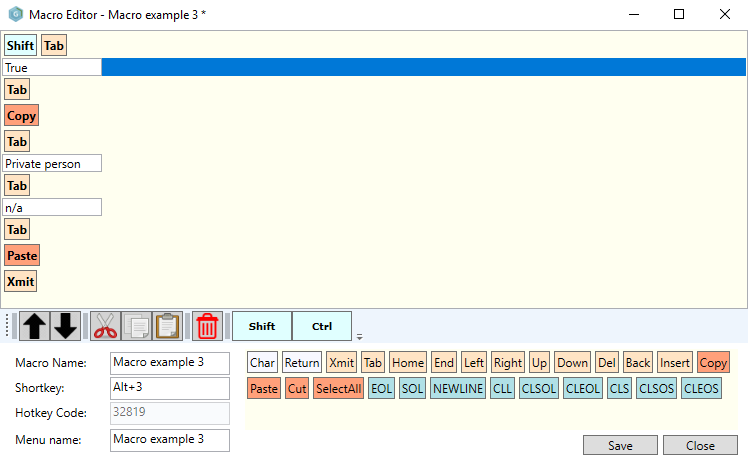
The top panel displays keypress events. Each event appears as a macro command block that runs from top to bottom when the macro plays. You can enter characters in the Char command block by selecting that block in the top panel.
To add macro command blocks, select the desired block in the lower-left panel. The block is then added below the currently selected block.
- Move command up: Moves the selected block(s) up by swapping their position with the block above.
- Move command down: Moves the selected block(s) down by swapping their position with the block below.
- Cut: Removes the selected block(s) from the macro and places the block(s) on the clipboard.
- Copy: Copy the selected block(s) to the clipboard.
- Paste: Adds the block(s) on the clipboard below the currently selected block.
- Delete selected command(s): Removes the selected block(s).
- Toggle shift state: Add the shift modifier to the selected block(s).
- Toggle ctrl state: Add the control modifier to the selected block(s).
- Macro Name: Displays the name of the macro.
- Shortkey: After selecting the text box, you can set a keyboard shortcut by pressing the desired key combination.
- Hotkey Code: Displays the hotkey code of the shortkey.
- Menu name: The name of the macro that will be displayed in the Macros menu of AMT Screens.
If you modify a macro, an asterisk appears after the macro name in the title bar. You can then save the macro by selecting the Save button (shortcut Alt+S), or discard changes by selecting the Close button (shortcut Alt+C) and confirming the action. When the macro is assigned to more than one user, changing the macro content will create a new copy of the macro with the same name.
Table of available macro command blocks
| Block | Description |
|---|---|
| Char | Types the text inserted in the Char block. |
| Return | The Return key. |
| Xmit | Execute a Transmit command. |
| Tab | Insert a Tab. |
| Home | Move the cursor to the start of the edit/memo box. |
| End | Move the cursor to the end of the edit/memo box. |
| Left | Move the cursor one position to the left. |
| Right | Move the cursor one position to the right. |
| Up | Move the cursor one line up. |
| Down | Move the cursor one line down. |
| Del | Execute a Delete, i.e. delete the character just after the cursor. |
| Back | Execute a Backspace, i.e. delete the character just before the cursor. |
| Insert | Toggle the Insert/Overwrite edit mode. |
| Copy | Copy selected text to clipboard. |
| Paste | Paste text from clipboard. |
| Cut | Delete selected text and copy to clipboard. |
| SelectAll | Selects all content in the currently focused field. |
| EOL | Move the cursor to the end of the current line. |
| SOL | Move the cursor to the start of the current line. |
| New Line | Execute a New Line command. |
| CLL | Clear the current line. |
| CLSOL | Clear the current line from the current position of the cursor to the start of the line. |
| CLEOL | Clear the current line from the current position of the cursor to the end of the line. |
| CLS | Clear Screen, clears the complete contents of the current Form. |
| CLSOS | Clear to Start of Screen, clears the contents of all Fields from the current position of the cursor to the start of the current Form. |
| CLEOS | Clear to End of Screen, clears the contents of all Fields from the current position of the cursor to the end of the current Form. |
Macro security
Opens the Macro security window, where you can assign macros to users or roles to grant access.
| This option is visible only to users assigned to a role with the security component "Advanced Macro Editor" enabled. |
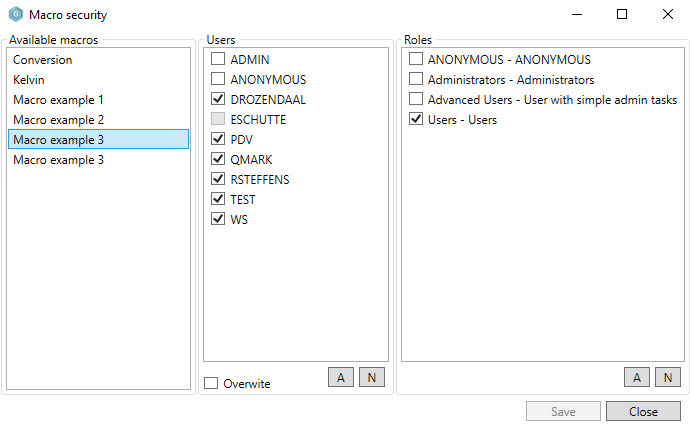
To assign a macro, select it from the Available macros panel, select the user(s) or role(s), and select Save. Assigning a macro to a role grants access to that macro for every user who is assigned to that role. Macros must always have at least one user or role assigned.
If a user already has an assigned macro with a duplicate name, assignment is initially blocked by a disabled checkbox for that user (see user "ESCHUTTE" in the screenshot above). This helps prevent accidental overwrites. If you select Overwrite, this safeguard is removed and the macro can be assigned, overwriting the existing macro with the duplicate name for that user. For duplicate macro names, only one macro can be assigned to a role. If you use Overwrite to assign a different duplicate-named macro to a role, the previously role-assigned macro loses its role assignment.
User macros
At the bottom of the Macros menu, all macros with a defined Menu name field are displayed if they are accessible by the current user. If a macro has a keyboard shortcut, it is displayed to the right of the macro name.