
Usage of Classes
In order to make use of a global class it is necessary to define it in the Type Class definition first (Repository Tree > Types > Classes). Read how to do this on the Classes pages.
Example Usage
In this example we will use the following variables inside a class' definition to create a global class named car. A class can also be local and looks the same, but it is defined inside a Form, Report, Global Routine, or Web Service's definition.
begin_definitions
type
  car : class
    public
    manufacturer  : alpha 20
    model         : alpha 20
    primary_color : string
    amount_doors  : numeric 1
    is_automatic  : boolean
  end_class

end_definitions| Please note that a global class needs to be checked in using Revision Control before it can be used. Any changes made to the class are also required to be checked-in before they take effect. The latest checked-in version will always be used. |
The class is now ready to be used in Forms, Reports, Global Routines, and Web Services.
Class Usage
To start using the class, we will begin by defining a variable with the type of the class. We will then use this variable to create an instance (our first object) of the class.
The syntax to construct a class is as follows:
<variable> := <class>.<create> () |
<class-instance> := null |
Classes and Routines
The initial value given to a variable in an instance can also be changed at a later point in code. For example, the color red of a car object could be changed to become the color yellow instead.
In the following example, a routine was added to change the color of the variable "primary_color".
routine change_car (car1_yellow : car)
begin_routine
  car1_yellow.primary_color := 'Yellow'
end_routine
Then we display the change made to the instance:
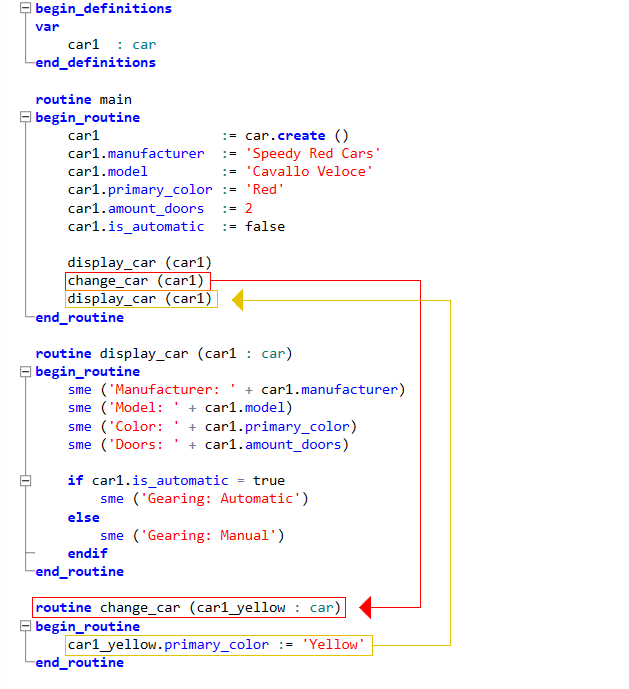
display_car (car1)  // displays the "car1" instance before the change with the color red
change_car (car1)   // starts the routine to change the color
display_car (car1)  // displays the "car1" instance after the change with the color yellow
After running the report the following result is displayed:
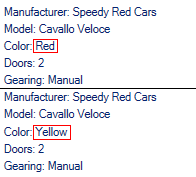
As you can see, the first result is the original car in the color red, the second result is the same car but in the color yellow, and all other values remain unchanged.
The newly created routine "change_car" uses a local variable named "car1_yellow". This variable points to the same place in memory as the instance "car1" and is displayed when the second "display_car" is called. The image below demonstrates a complete example of the report
If we create a new instance inside the routine, this will not be displayed when "display_car" is called because this instance is local to the routine. The displayed car (car1) output would still be the original red car.
routine change_car (car1_yellow : car)
begin_routine
  car1_yellow               := car.create ()
  car1_yellow.primary_color := 'Yellow'
end_routine
Routines can also create a new local instance of a class with empty values for the class' members through the use of the keyword var. To do so, include the keyword var inside the routine's parameter before defining the variable which is to become an instance of the class.
Example:
routine <routine_name> (var <instance> :
<class>) |
Then create a new instance of the class car.
Example code:
routine change_car (var car1_yellow : car)
begin_routine
  car1_yellow               := car.create ()
  car1_yellow.primary_color := 'Yellow'
end_routine
This assigns the color "Yellow" to the object "car1_yellow" and leaves all other values for each class member empty. It can therefore sometimes be useful to have a Class Create Routine that automatically assigns default values to class members upon creation of a new instance.
Nested Classes
Nested classes are classes that are present within another class.
The following images shows two classes, the class engineType and the class tiresType.
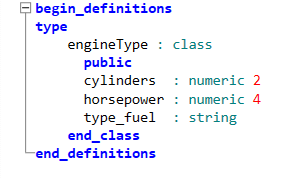
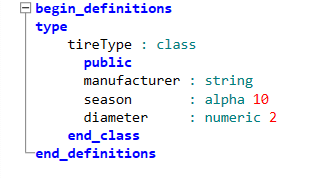
The two classes above are then nested inside the class car shown below.
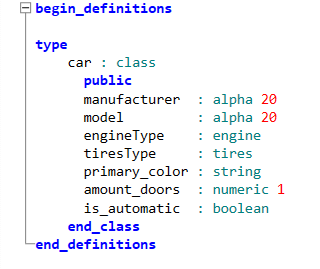
However, it is not possible to make a class a member of itself, for example by making the class car a member of the class car. It is also not possible to make the main class a member of a nested class, for example by making class car a member of its nested class engineType.
The main class as well as the nested classes require an instance to be created to be able to make use of these nested classes.
The following example shows the usage of all three classes that we created. The class car is used as the main class and the classes engineType and tireType are nested within. In the second block of code you can see that our instance "car1" has values assigned to its engine and tires variables.
begin_definitions
var
  car1  : car
end_definitions

routine main
begin_routine
  car1               := car.create ()
  car1.engine        := engineType.create ()
  car1.tires         := tireType.create ()
  car1.manufacturer  := 'Speedy Red Cars'
  car1.model         := 'Cavallo Veloce'
  car1.primary_color := 'Red'
  car1.amount_doors  := 2
  car1.is_automatic  := false
  car1.features (true)
  car1.engine.cylinders   := 8
  car1.engine.horsepower  := 750
  car1.engine.type_fuel   := 'Gas & Electric'
  car1.tires.manufacturer := 'Slick & Grippy Co.'
  car1.tires.diameter     := 19
  car1.tires.season       := 'Summer'
  display_car (car1)
end_routine
Class Functions
The following functions can be used in a class constructor:
|
Create () Returns a new empty class instance of the class constructor. Example syntax: car1 := car.create () |
|
FromJson (<Json String>) Returns a class instance of the class
constructor filled with values from a Json String. Example syntax: car2 := bike.FromJson (JsonAsString) |
|
FromXml (<XML String>) Returns a class instance of the class constructor filled with values from an XML String. In case of errors, ResOk and GetLastResult will be set to false (RESULTOKTO can optionally be used with this function). Example syntax: car3 := car.FromXml (XmlAsString) RESULTOKTO resOkBoolVar |
The following functions can be used with a class instance:
|
ToJson () returns all the elements in the class instance as a Json String. Example syntax: JsonAsString := car1.ToJson () |
|
ToXml () returns all the elements in the class instance as an Xml String. Example syntax: XmlAsString := car2.ToXml () |