Installing OpCon Service
Prerequisites
The ASP.NET 6.* Hosting Bundle is required for the OpCon service.
Adding OpCon service to the Control Center
To install the AMT OpCon service in an AMT Environment, an entry must be added to the Own Services section. This section can be found in the System Configuration -> Services -> Own services tab of the Control Center.

In this tab click on the Add button to add an Own service, in this case the OpCon Service. Enter the required information in the opened install window according to the shown example.
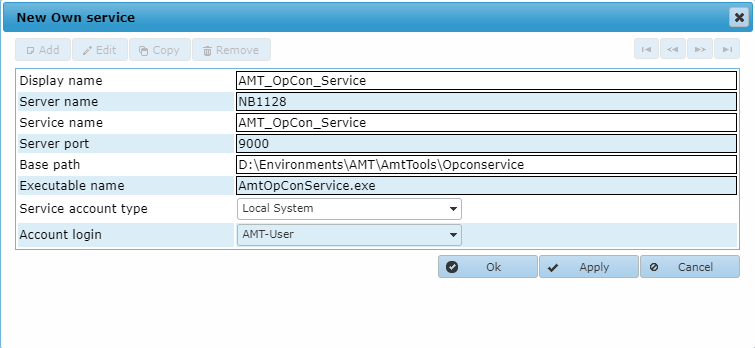
- Display name: Sets the displayed name of the OpCon service inside the Control Center
- Server name: The name of the server the OpCon service will be installed and running on
- Service name: The name of the OpCon service to use in the Windows operating system
- Server port: The port used by the Control Center to receive status updates of the Own service. This should be set to the port used in the BaseAddress setting of the OpCon service configuration file.
- Base path: The path to the folder where the executable of the service can be found. For an OpCon service this folder is <AMT System Basepath>\AmtTools\Opconservice\
- Executable name: The name of the OpCon service executable: AmtOpConService.exe
- Service account type: The type of Window Service to use for this service. Possible values are Local System, Local Service, Network Service, and User. When set to User the field Account login has to be set to a valid Login Account.
- Account login: The Login Account to use when Service account type has been set to the value User. The list of accounts shown are the Login accounts added in Security Configuration -> Login accounts. To be able to us this Login account for starting and stopping this service the underlying Window User account has to be granted the right to control Window Services (see Controlling Services from a User Account).
Installing the OpCon service as a Window System service
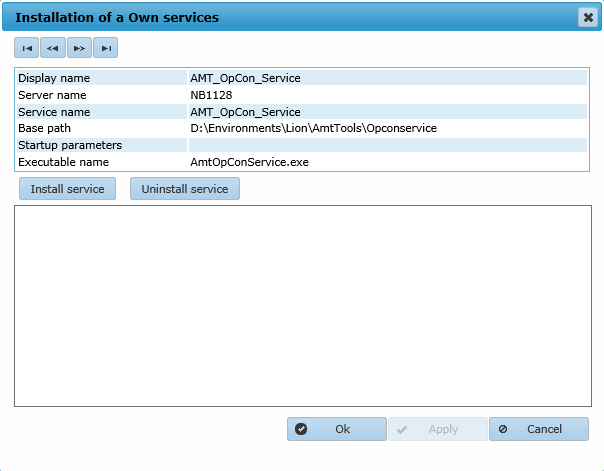
Selecting the Opcon service and then clicking the (De)Installation option will open the Dialog shown below.
The OpCon service can now be installed as a Window System Service
by clicking the 'Install service' button. Note that this option will
only work if a login account with correct security rights has been added
to the Login accounts in the ControlCenter.
Configuring the OpCon service
After having installed the OpCon service it needs to be configured before it can be started.
The configuration settings need to be set in a file named appsettings.json in the AmtTools\OpCon folder of your AMT environment.
A sample file named SAMPLE_appsettings.json is located in the OpCon folder, copy and rename this file to appsettings.json and open it in a text editor like Notepad.
Depending on which protocol will be used (HTTP or HTTPS) different settings should be used in the appsetting.json file.
HTTP
To connect to the Amt OpCon service via the HTTP protocol, the following settings should be set in the appsettings.json file:
| { |
| "Kestrel": { |
| "Endpoints": { |
| "HttpEndpoint": { |
| "Url": "http://<server>:<Port>" |
| } |
| } |
| }, |
| "Amt": { |
| "LogSeverity": "Debug", |
| "DefaultAppName": "DEMO2" |
| } |
| } |
- HttpEndpoint: { "Url": The HTTP address of the AMT Opcon Service where SMA OpCon can connect to. This address must also be set as AMT_BATCH_SERVER_ADDRESS of the SMA OpCon connector configuration. Localhost may not be used as value in the address. The port can be any free TCP/IP port and should also be set in the 'server port' field of the own service in the control center.
- LogSeverity:
- Informational: Only informational messages are logged.
- Debug: All debug messages are logged.
- DefaultAppName: The default Amt application name.
HTTPS
To be able to connect to the AMT OpCon service using HTTPS, an SSL/TLS certificate must be configured in the appsettings.json file.
There are a multiple ways to configure the loading of an certificate in the settings file:
Loading from a certificate store (Recommended), loading from a .pfx file with password or loading a .pem/.crt and key file with password.
Settings for the first two methods are commented out in the sample settings file.
| Only one method to load the certificate should be configured in the settings file. |
On this page the recommended method will be described, the loading from a certificate store.
For more information about the other methods see the following external Microsoft learn page:
Configure endpoints for the ASP.NET Core Kestrel web server
Loading from a certificate store
After purchasing or creating an X.509 (SSL/TLS) certificate, it can be imported in the windows local system by running certlm.msc and importing the certificate in a store (e.g. Web Hosting or Personal).
When successfully imported, the certificate can be double clicked to display its fields under the 'Details' tab. The subject of the certificate is needed for the next step.
To connect to the AMT OpCon service via the HTTPS protocol, the following settings should be uncommented and set in the appsettings.json file:
| { |
| "Kestrel": { |
| "Endpoints": { |
| "HttpsEndpoint": { |
| "Url": "https://<server>:<Port>", |
| "Certificate": { |
| "Subject": "amtserver.example.com", |
| "Store": "webhosting", |
| "Location": "LocalMachine" |
| } |
| } |
| } |
| }, |
| "Amt": { |
| "LogSeverity": "Debug", |
| "DefaultAppName": "DEMO2", |
| "HttpRedirection": true |
| }, |
| "https_port": <HTTPS_Port> |
| } |
- HttpsEndpoint: { "Url": The HTTPS address of the Amt Opcon Service where SMA OpCon can connect to. This address must also be set as AMT_BATCH_SERVER_ADDRESS of the SMA OpCon connector configuration. Localhost may not be used as value in the address. The port can be any free TCP/IP port and should also be set in the 'server port' field of the own service in the control center.
- Subject: The subject of the certificate e.g. the fully qualified domain name of the server.
- Store: The logical store name of the certificate store where the certificate is stored. For example "webhosting" or "personal".
- Location: The location of the certificate store, either "LocalMachine" or "CurrentUser".
- LogSeverity:
- Informational: Only informational messages are logged.
- Debug: All debug messages are logged.
- DefaultAppName: The default Amt application name.
- HttpRedirection: If uncommented and set to true, HTTP traffic will be redirected to HTTPS. If enabled the 'https_port' setting should be set (see below).
- https_port: The HTTPS port needed for HttpRedirection, should be set to the same port as the port in the HttpsEndpoint Url.
HTTP and HTTPS can both be enabled if they use different ports, in which case HttpRedirection should be disabled.
| It is not recommended to use a Self-Signed certificate in production environments. To use Self-Signed certificates, a setting needs to be added to the Certificate section: "AllowInvalid": "true" |
Starting/Stopping the OpCon service
The OpCon service can be started or stopped in the Server Control page of the Control Center.
Healthprobe for load balancers
A health-probe had been build in the OpCon Service which returns a HTTP 200 status (OK). This can be used for (Azure) load balancers and other services to determine if the Service is running. This health-probe can be reached at <Url>/healthprobe (e.g. http://nb1128:9000/healthprobe ).
Status page
A status page of the OpCon service is available from the 'Server control' page in the Control Center. When selecting the OpCon Service own service node, the tab 'Status' can be selected to display the current status of the Service. The status page can also be reached outside of the Control Center by entering the BaseAddress url of the OpCon Service into a browser.
Authorization
The OpCon connector needs to logon with a valid user. The User /password must exist or have been created in the control center already. In the SMA OpCon connector these must be set in the AMT_USER and AMT_USER_PASSWORD settings.
Note: If windows authentication is used in the control center/application center, no password will be set for the users automatically. A password must be set manually for the user intended to be used for the OpCon connecter.