Remote Print Service
In case a printer is not directly accessible from the Control Center server (e.g., the printer is on a different network or domain), it is possible to set up a Remote Print Service to access that printer.
Prerequisites
Remote print service server
On the server running the remote print controller .NET 8.0.3 Runtime (or a newer 8.* version) is required. The newest stable version of which can be found on the Microsoft website:
Installing the Print Database Web API
Due to security reasons, the Print Database Web API is not automatically installed with the rest of the AMT environment, making it necessary to install the Print Database Web API manually.
The first step to install the Web API is to manually add an application to the IIS instance where your Control Center is also located.
Adding IIS application
Start the IIS Manager and in the left pane select the website where the AMT environment is hosted, often this is the 'Default Web Site'.
Then right click the AMT application under that website and select Add Application.
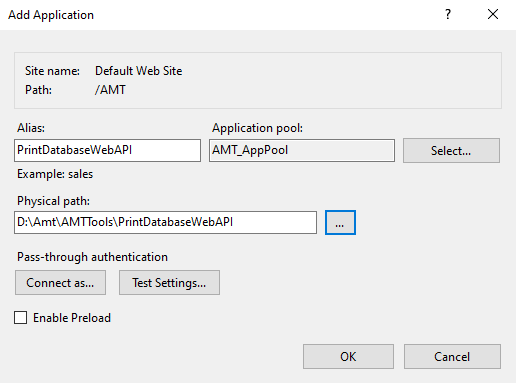
In the opened dialogue enter the name to use for the Print Database Web API and set the Physical path to the "PrintDatabaseWebAPI" folder located under the AMTTools folder of the AMT environment. The Application pool used for the Web API needs to have access to the system database. As this is already the case for the Application pool used for the control center, the same application pool can be used here.
Setting IIS Application Authentication method
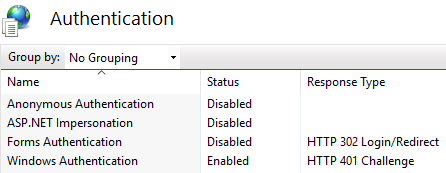
After the application has been added to IIS the next step is to set the correct authentication settings in IIS.
For the Print Database Web API only windows authentication is supported, this can be set by selecting the newly created IIS application, then in the middle pane double click the Authentication icon. Then set the Authentication methods as shown below.
Restart IIS
Finally restart the IIS to make sure that all changes made have taken effect.
Adding the remote print controller to the control center
To install this Remote Print Service, first add the Remote Print Service to the Control Center like a regular Print Service with the checkbox "Remote" enabled.
Also in the Control Center, set up a PrintQueue for the Remote Print Service, and add the Printer(s) from the viewpoint of the remote server.
Installing the print controller on the remote server
Next the "PrintController" folder with its content (Found in the AMTTools folder in the AMT-COBOL environment) needs to be copied to the remote server.
Inside the copied Printcontroller folder a configuration file with the filename "AmtPrintService.dll.config" needs to be configured.
The remote print controller will retrieve the print requests from the Print Database Web API by impersonating as a predefined domain user which has access to the Control Center. This domain user must be set in the configuration file.
The filled in domain name, user name, password and authentication scheme values will be encrypted in the config file after the config file has been read by the Remote Print Controller for the first time.
AmtPrintService.dll.config appSettings
The values in the appSettings section should be changed to match your environment, the settings are:
- ApiBaseAddress: The URL or IP address of the Print Database Web API, including the protocol, port and IIS path.
Syntax: <Protocol><Hostname/IP>:<Port>/<IIS path>/<PrintDatabaseWebAPI application name>/ - ApiAuthenticationDomain: The domain name of the network where the Print Database Web API is running.
- ApiAuthenticationUserName: A domain user that has access to the Control Center.
- ApiAuthenticationPassword: The password of the above domain user.
- ApiAuthenticationScheme: This should always be set to NTLM which indicates windows authentication.
Example of configured appSettings before encryption.
<add key="ApiBaseAddress" value="http://amtweb.contoso.local:80/AMT/PrintDatabaseWebAPI/" />
<add key="ApiAuthenticationDomain" value="contoso" />
<add key="ApiAuthenticationUserName" value="printuser" />
<add key="ApiAuthenticationPassword" value="zGN&3$rJ" />
<add key="ApiAuthenticationScheme" value="NTLM" />
</appSettings>
Installing the windows service
After the config file is configured, the windows service can be installed on the remote server. In an elevated command prompt (run as administrator), navigate to the PrintController folder and type the following command:
The Remote Print Service name should match the service name specified in the Control Center.
After starting this windows service on the remote server, it should then display as running (green icon) on the "Server Control" page in the Control Center.