Label Management
Once object revisions are assigned to labels, the Label Management function makes it easier to manage the promotion of object revisions from one generation set to another, e.g. from 'Development' to 'Function Test'. Also, should you wish to undo a release of code and reinstate previous object revisions, labels help you to identify the object revisions that require reinstatement. Object revisions are assigned to labels either at check-in or afterwards. It is recommended to use labels each time you promote code between generation sets.
Assigning a label at check in or promotion of a revision can be made mandatory by enabling the "Force label selection on checkin's" setting in the Enterprise Options 'Configuration' screen.
In the Revision Control screen, the following buttons are used for assigning object revisions to
labels:
The "Check in" button opens a dialogue box where you may optionally assign the object revision to
a label.
The "Label..." button lets you assign the object revision to a label.
The "Promote..." button opens a dialogue box where you may optionally assign the object revision to
a label.
NOTE: an object revision can be assigned to multiple labels.
The 'Label Management' screen is accessed by using the open command 'LAB'. You may also select the menu item
'View - Label Management'. Ensure that you have first selected the required application from the Repository screen. If you are editing/viewing any
objects then you will be taken to the label management for that application. The application name will be shown
in the title bar of AMT-COBOL Developer Studio.
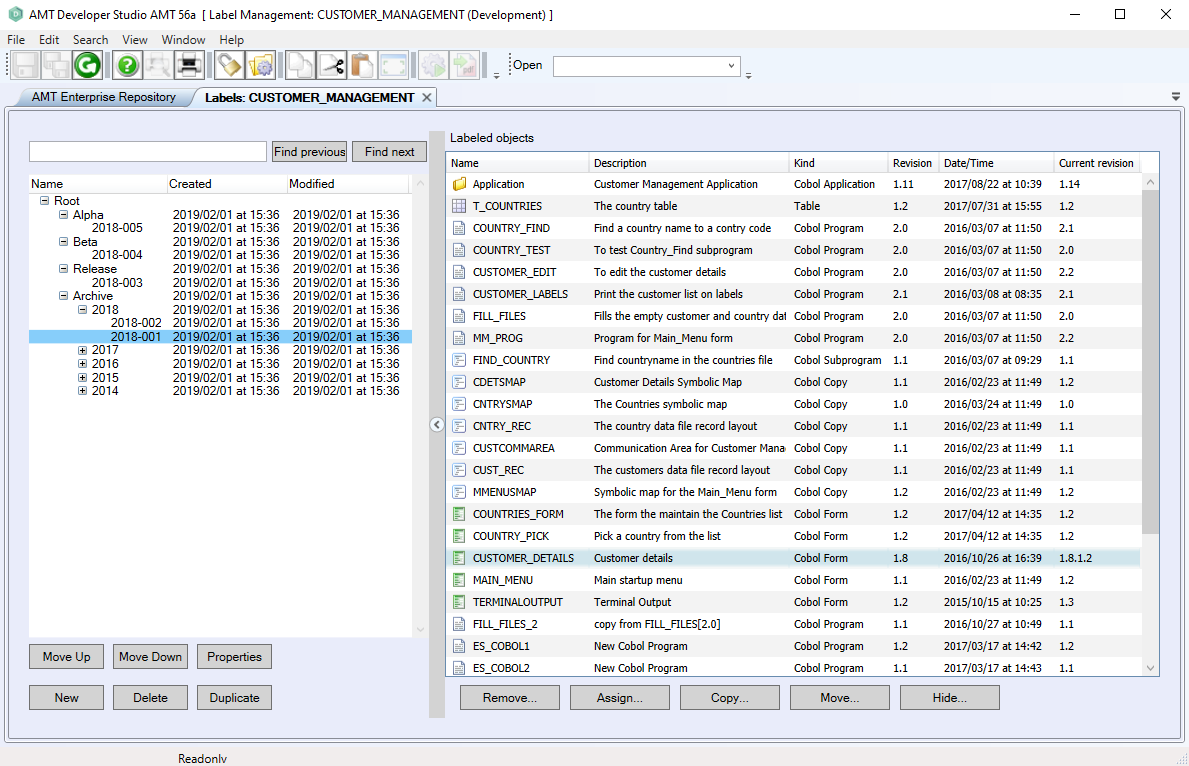
The labels are presented in a tree view in the left window, the objects assigned to the label are displayed in the right window.
Each label can also act as a node by moving other labels onto them.
Labels can be moved from one node to an other by dragging them to the desired label.
Using the Shift or Ctrl key,
multiple labels within the same node can be selected and then be moved up or down by clicking the corresponding
button.
To move multiple labels from one node to another, keep holding the Shift or Ctrl key and the left mouse
button down while dragging the labels to their new location.
The following buttons are provided on the label management screen:
- Find previous: Find the previous label with the entered text.
- Find next: Find the next label with the entered text.
- Move Up: Moves the selected label up within its node.
- Move Down: Moves the selected label down within its node.
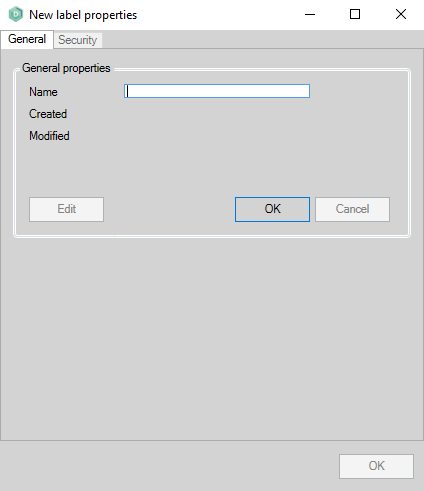
- Properties: To change the name or security settings of a label, select it from the tree view
and click "Properties". To change the name, click "Edit" in the properties window 'General' tab. Alter the name then
click "Ok". Label names can be changed at any time. The label management security settings are accessed by clicking
the 'Security' tab, information on label management security can be found in the 'Label Security' chapter.
- New: The "New" button will open a new label properties screen. To create a new label, specify a name in the 'Label' field, then click "Ok". The name that you choose for a label is free format, but it is advisable to include the date that the label was promoted in the name.
- Delete: To delete a label, select it from the tree view and click "Delete". You will be asked for confirmation. This only deletes the label, not the physical objects within it. If a label has sub labels, they have to either be moved or deleted first. Multiple labels can be deleted at the same time by selecting each label with 'ctrl + click'.
- Duplicate: Adds a new label with the same objects as the selected label with the name <current
label>_Duplicate<1,2,3 ...>.
- Remove...: To remove objects from a label, select the objects from the right-hand pane (use 'ctrl + click' or 'shift + click' for multiple selections) and click "Remove...". You may also right-click in the right-hand pane and select "Remove selected from label" from the popup menu.
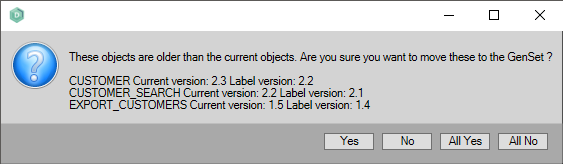
- Assign...: To assign objects to the current generation set, select the objects from the right-hand pane (use 'ctrl + click' or 'shift + click' for multiple selections) and click "Assign...". If the objects are already present in the generation set with a different revision version, an extra warning will be shown (see screenshow below). You may also right-click in the right-hand pane and select "Assign selected to generation set <current generation set>" from the popup menu.
- Copy...: To copy objects from one label to another, select the objects from the right-hand pane (use 'ctrl + click' or 'shift + click' for multiple selections), click "Copy..." and select a target label in the pop-up window. You may also right-click in the right-hand pane and select "Copy selected to other label" from the popup menu.
- Move...: To move objects from one label to another, select the objects from the right-hand pane (use 'ctrl + click' or 'shift + click' for multiple selections), click "Move..." and select a target label in the pop-up window. You may also right-click in the right-hand pane and select "Move selected to other label" from the popup menu.
- Hide.../Show...: Hides or shows all the objects that have the same revision version as the current generation set.
To promote the code in a label to another generation set, first select the target generation set by
clicking the "Choose Generation Set" icon in the top toolbar. Select the label from the left-hand pane, then click the
"Move to generation set <Current GenSet>" button. The target generation set name is also displayed next to
this button. In the target generation set, the newly transferred objects will require a generate. When moving objects
to a GenSet, only the objects assigned to the label itself will be transferred, not the objects in sub
labels hanging below the selected label.
When one or more objects have an older revision than the object
in the generation set to move to, a warning will be issued making it possible to only move newer versions to the
generation set.
Label Management Security
The label management security is an extension of the AMT Developer Studio security system for labels. Label permissions can be set per usergroup for every label, or be inherited from the parent label/node.
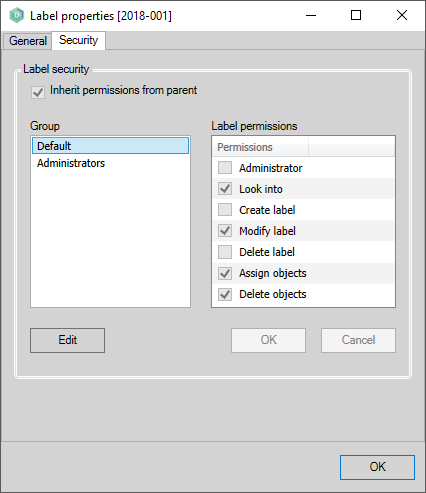
By selecting the usergroups, the current label permissions for that group can be viewed.
To edit the label
permissions of a usergroup, first select the correct usergroup and then click on the "Edit" button. When the 'Inherit
permissions from parent' checkbox is checked, all the permissions are copied from the parent label/node of the label.
When it is not checked, the individual label permissions can be enabled or disabled by (un)checking the checkbox next
to the permission.
The label permissions are as follows:
| Label Permission: | Description: |
| Administrator |
Usergroups with this permission have all label permissions below and are allowed to modify label management security settings. |
| Look into |
Usergroups with this permission can view the contents of the label. |
| Create label |
Usergroups with this permission can create new labels. |
| Modify label |
Usergroups with this permission can modify the label name and position. |
| Delete label |
Usergroups with this permission can delete the label. |
| Assign objects |
Usergroups with this permission can assign objects to the label. |
| Delete objects |
Usergroups with this permission can delete objects within the label. |
| Changes to permissions of other users will become active once the user has restarted the AMT Developer Studio. |