RTQuery
The RTQuery tab offers the end user a database query tool for the application database.
RTQuery has two main modes, Table mode and Query mode.
Table mode lets the user view the content of a table, whereas Query mode allows the user to execute custom
queries.
The radio buttons in the top left show the current mode and allows you to switch between the two modes.
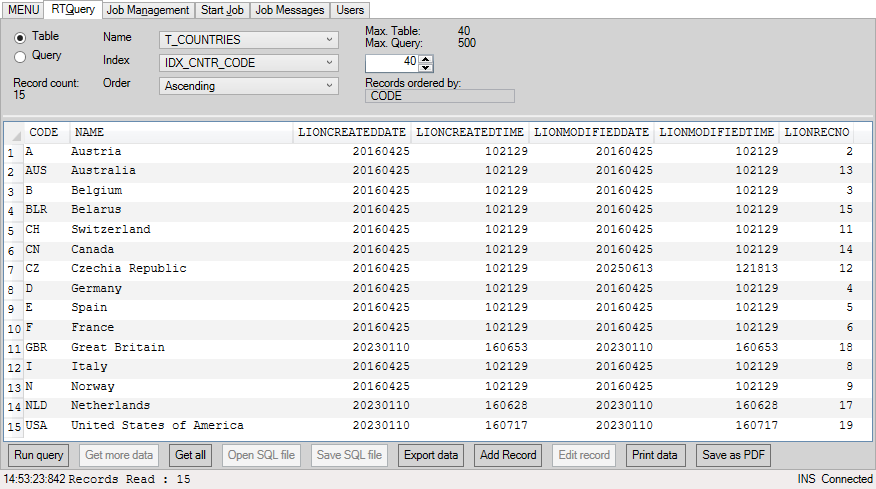
Table mode
In 'Table' mode, drop-down menus are visible where you can select the Table, Index, sort Order and an editbox where
the number of records shown per query can be set.
Once a table is selected, the content of that table is displayed in the main grid.
If there are more records in the table than the records shown per query setting, clicking the 'Get more data' button
will display additional records.
Additionally the currently displayed record count is shown, as well as the maximum records per query limit for table mode & query mode (set in the Control Center Application setting RTQuery tab) and on which column(s) the selected index is sorting the records.
In the status bar at the bottom of the screen the number of displayed(read) records is also displayed.
Query mode
In 'Query' mode, a text field is visible where custom queries can be entered.
Additionally the currently displayed record count is shown.
Once a custom query has been entered, the query can be executed by clicking the 'Run query' button.
With the button 'Open SQL file' a custom query can be loaded from an SQL file. The current entered query can also be save to an SQL file by clicking the 'Save SQL file' button.
Multiple queries in the text field can be separated by a semicolon (;). The query where the cursor is located is active and will be used when running the query, upon executing the query the next query will be set as active.
In the status bar at the bottom of the screen the number of read records will be displayed after running select queries. After running update, insert or delete queries the number of affected rows will be displayed.
| RTQuery uses a separate connection to the application server than the normal connection used by the rest of AMT Screens. One of the consequences of this separate connection is that a user is still able to use RTQuery if a long transaction is being processed in a form. |
|
Users without RtQuery update (RtQuery UPD) security rights can not run queries containing certain keywords associated with the modification of database records. However, columns with the same name as a reserved keyword can still be used through an alias. In the following example, records from a column name with a reserved keyword, such as "DELETE", can be retrieved even by a user without RtQuery update rights:
|
Records
Selecting a record field allows the user to copy the value of that field by either using the Ctrl+c keyboard shortcut or by right-clicking on the field and selecting the 'Copy to clipboard' option in the context menu described below.
By right-clicking somewhere in the record list part of the RTQuery tab a context menu is opened with the following options:
- Copy to clipboard: Copies the value of the selected record field to the clipboard.
- Edit single record: opens an 'Edit record' window filled with the values of the selected record, see the 'Edit record' section below.
- Add new record: opens an empty 'Edit record' window which can be used to add a new record to the table.
Note: in query mode it is only possible to add or edit a record if the identify field/column is present in the selection/record set of a select query and the select query only involves a single table.
Buttons
The following buttons are available depending on the RTQuery mode and status.
- Run query: In Query mode, this button will execute the currently entered custom query.
- Get more data: In Table mode, this button will display more records when the table holds more records than the records per query setting. This button will be greyed out once the "Query sliding expiration" value has been exceeded.
- Get all: This button will display all records of the table, ignoring the records per query settings, up to a maximum of 2,147,483,647 (32-bits) records.
- Open SQL file: In Query mode, an SQL file containing a custom query can be loaded.
- Save SQL files: In Query mode, saves the currently entered custom query to an SQL file.
- Export data: In both Table and Query modes, the displayed records can be saved to a file. Either a semicolon (;) delimited csv file, a comma (,) delimited csv file or a tab delimited txt file.
- Add record: In both Table and Query* modes, this button opens an empty 'Edit record' window which can be used to add a new record to the table. See the 'Edit record' section below.
- Edit record / View record: In both Table and Query* modes, this button opens an 'Edit record'
window when a record is selected. See the 'Edit record' section below.
In case a user only has the Rt Query INQ security component activated without the Rt Query UPD security component,
both the button and subsequent window will show 'View record' instead.
- Print data: In both Table and Query modes, the displayed records can be send to a user selected printer.
- Save as PDF: In both Table and Query modes, the displayed records can be saved as a PDF file.
*Note: in query mode it is only possible to add or edit a record if the identify field/column is present in the selection/record set of a select query and the select query only involves a single table. For Oracle databases, this means that ROWID must be included in the select query. e.g. SELECT ROWID, CUSTOMERS.* FROM CUSTOMERS
Edit record / View record
When a record is selected and the 'Edit record' / 'View record' button is clicked a window with the same name is opened.
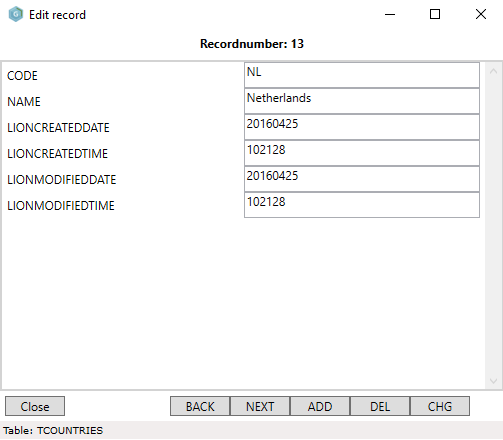
In this window the values of the selected record are shown and can be edited.
The following buttons are available:
- Close: Closes the 'Edit record' window
- BACK: Navigates to the previous record in the result set when possible.
- NEXT: Navigates to the next record in the result set when possible.
- ADD: Adds a new record with the values as entered in the fields above to the table.
- DEL: Removes the selected record from the table.
- CHG: Updates the selected record in the table with the values as entered in the fields above.
Users without the Rt Query UPD security component activated can only use the Close, BACK and NEXT buttons.