
Indexes
Indexes provide an efficient means for accessing a table. There are two ways to access the index definition screen in AMT Developer:
- Open the table definition that the index is related to by first opening the "Database" folder from the repository window followed by the "Tables" sub-folder. Double-click on the required table name then select the "Indexes" node in the left-hand pane; OR
- Open the "Database" folder from the repository window followed by the "Indexes" sub-folder. Double-click on the required index name (or right-click on the index name and select "Options" from the pop-up menu)..
Creating an index
- To create a new index, you must use method 1 above and open the table definition first.
- Select the "Indexes" node in the left-hand pane, then click "Add new index" in the right-hand pane (or right-click the "Indexes" node then select "Insert" from the pop-up menu).
- The Index screen appears where you define the properties for the index. To complete the specification, see "Adjusting an index" below.
Adjusting an index
- To adjust an existing index, use either method 1 or 2 to access the index definition.
- The index properties screen is shown below:
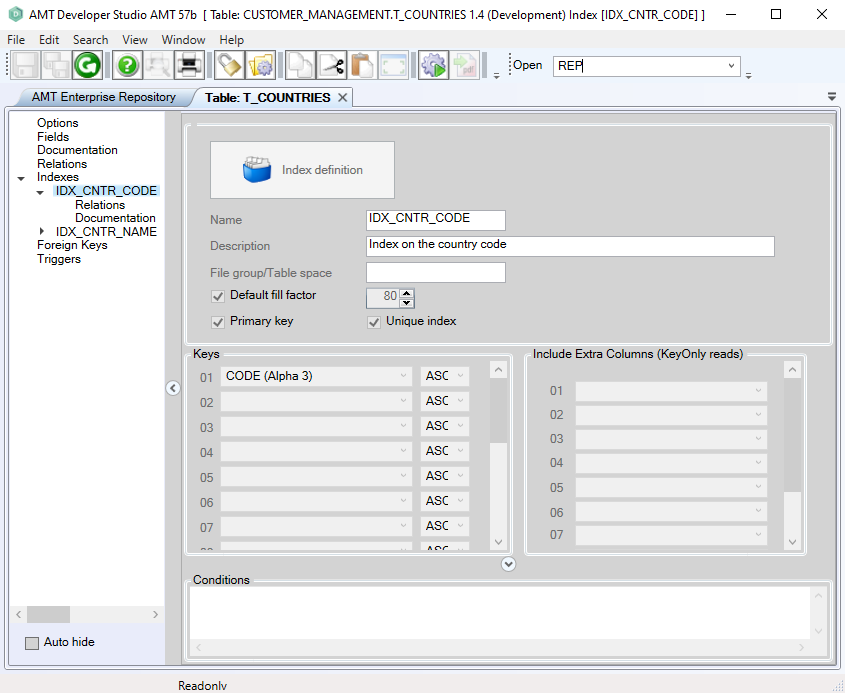
The following is a description of the index properties:
|
Property: |
Description: |
Value: |
|---|---|---|
|
Name |
Name of the index. |
<Text> |
|
Description |
Description of the index. |
<Text> |
|
Filegroup/ Tablespace |
Name of the MS-SQL filegroup or Oracle tablespace, as is defined by the database administrator. info Note: If the index is set as primary key, the filegroup/tablespace of the table will be used for this index regardless of the value entered here. This is because indexes set as primary key in AMT are created as clustered indexes. |
<Text> |
|
Default fill factor |
If checked, the index will use the default fill factor that is specified in the application options. If unchecked, the fill factor for the index will be set according to the value that is specified in the edit box on the right. For more help on determining a suitable value, please refer to the description for the default fill factor setting in the application options screen. |
|
|
Unique index |
If checked, then AMT will enforce that key values created in the index will be unique. Any attempt to create records with non-unique key values will result in a SQL error. If unchecked, then the index keys can have non-unique values. |
|
|
Primary |
If checked, then the index is set as primary key. This also automatically selects "Enforce Unique index". The following conditions apply:
The primary key setting for an index overrules the application option "Create primary key on Lionrecno". Indexes set as primary key in AMT will be created as clustered indexes. |
|
|
Keys (panel) |
The keys for the index. |
|
|
Include Extra Columns (KeyOnly Reads)(panel) |
When performing KeyOnly reads the Columns selected in this panel will also be read beside the Columns of the Index Keys. The Columns selected will be added to the index but will not affect the unique constraints of the index. info Note: Because the Columns are added to the Index a Database Reorganization is needed. When using an Oracle database, including extra columns on a unique index will create an additional index on the database named: <Tablename>_<indexName>_UNIQUE |
|
|
Conditions (panel) |
Conditions can be specified which further filters the records that will appear on the index. You may use all field names here and can use logical operators ("AND", "OR" and "NOT") and comparison operators ("<", ">", "="). As can be seen in the example there are several ways of using Boolean-type fields. Additionally a NULL check can be added by using "IS NULL" and "IS NOT NULL". If fields are used that allow NULL values, a warning will be given in both the AMT Developer Studio and the AMT Reorganize program to give the programmer a chance to review if the condition statements will correctly handle NULL values or alternatively to change the column so that NULL values are not allowed. This warning is not given when a NULL check is specified. Examples: (Fields as defined on the table) (Condition statements) |
On completion, click the save button in the top toolbar of the Developer. The index must be checked in before it can be used in other objects.
|
Deleting an index
An index can be removed from the repository through the "Revision Control" screen.
Generate the application and reorganize the database
After an index is added, adjusted or deleted, a Whole System generate is required, followed by a database reorganize.
Index Relations
To see which objects use the index, open the index definition screen. Double-click on the index name (or click the "+" next to the index name) to expand the node. This will show a "Relations" sub-node beneath the index name. Selecting this sub-node will display the relations table for the index. See 'Relations'.
Index Documentation
See 'Documentation'.