Tables
Creating a table
Create a new table by following these steps:
- In the Repository window, open the application folder where you want to create the table.
- Select the Database folder. Open the context menu for the Tables subfolder and choose Insert table from the pop-up menu. A dialog box appears:
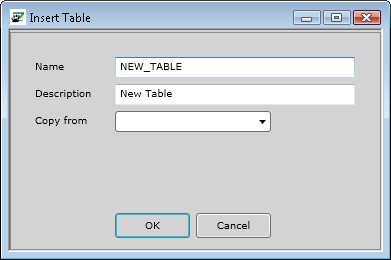
- Specify a value in the Name field. The Description field is optional. You may choose to copy an existing table by selecting a name from the Copy From list box. Tables that are currently locked will not appear in the Copy From list. Select OK to add the table.
- The Options screen appears, showing the name and description you entered. To complete the specification, see Adjusting a table below.
Adjusting a table
When you double-click on a table name, the Options screen for it appears by default. You specify further details by selecting the nodes in the navigation pane:
On completion, save the table. The save buttons can be found in the top toolbar of the Developer.
The table and any indexes created on it must be checked in first before it can be called from other objects. Note: Tables and indexes are checked in separately. Checking in a table doesn't automatically cause the indexes to be checked in.
Deleting a table
You can remove a table from the repository through the Revision Control screen.
Generate the application and reorganize the database
After a table or index is added, adjusted, or deleted, a Whole System generate is required, followed by a database reorganize.